Reassembly has begun!
After trailering the Jeep from the painter, it was time to take inventory of what we needed to do, and what parts we had. We did an o.k. job marking all of the bolts, nuts, and various pieces when we disassembled everything earlier this year, but not good enough. We were constantly searching for parts, or bolts and everything in between when reassembling some areas. I definitely learned that I need a better part marking system on the next vehicle I disassemble. This definitely played its part in a few delays we experienced as we were waiting on parts or making multiple trips to the hardware store.
One of the first things we worked on was the doors. And immediately we had a problem. While inserting the door locking cylinders, we damaged the paint. UGH. The paint was so fresh and thick enough that I was unable to seat the cylinder without issues. While trying to shove in the cylinder (with care, I swear!) this happened:

So, delay 1, on day 1.

I called the painter and he offered to fix it. I brought the door to him with the locking cylinder and he touched up the area, filed down some parts and installed the cylinder. Not a great start.
While we had wanted to start at the rear and move forward, our missing parts required us to jump around while parts were available. So after the door damage, we moved onto the light bar. Problem here also. The bar wasn't square, so it was not lining up with the windshield frame. I called my blacksmith friend (hes the one who welded everything together) and had him help out. He bent everything together in about 5 minutes, and we were good.


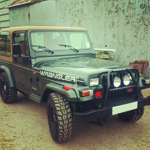
I think the Jeep looked a lot better with the lightbar. Almost if the lightbar is a missing accessory. Along with the lightbar, we installed the black rubber side step pieces.
Wanting to take the Jeep on our annual camping trip, I needed a trailer hitch. The Jeep is only rated for 2,000 so I wont be towing much, just a small trailer with supplies. One thing I wanted with the trailer hitch was retention of the bumperettes. A smittybilt JH44 2" class II looked promising. A quick order from SummitRacing proved that the pictures were correct. We installed the trailer hitch and bumperettes in one go. It was a challenge because the trailer hitch was super heavy and some bolts very difficult to reach.
After installing the trailer hitch and bumperettes, we worked on other rear parts. The tail lights, tire stop, tail gate tire protectors, rear tail gate seals and locking mechanisms. We also installed the stainless steel ball mount housing into the hole we drilled before the paint. The rear was mostly done at this point. Still needed to attach the tire carrier, find the bolts for the tail light housing and mount the rear fog lights.

After working on the rear, we moved onto the roll bar padding. It was then that we noticed a missing zipper pull that went... somewhere? I'm pretty sure it was there 8 months ago. Oh well

My coworker lives near the painter and knows him well, so he picked up the door for me about 2 weeks after I dropped it off. We reassembled the door locking mechanisms, and interior panels one evening. We did have to run to the Jeep dealership to get a small plastic piece that locks a metal bar into the external door latch. It had broken during disassembly and I had completely forgotten.

I forgot to take pictures during the reassembly, but trust me, you aren't missing much.
After installing the rollbar padding, door reassembly, we reattached the doors with their new seals and got to work on the windshield. With the new windshield cowl seal, we really had to pull on the windshield frame to get it to line up with the roll bar. It took a little muscle, but we made it all fit. We tighten down all of the rollbar an windshield frame screws, and attached the windshield visors. We also attached the mirrors after installing the doors on the Jeep

Some of the last installs needed were electrical based. Now, I work in IT, finished my basement, built retaining walls and can work on cars well enough, but auto electronics I know nothing about. My first thought was that the new lights needed to go through the electrical fuse box under the steering column, but I did some research and just bought a power distribution block. I ran a wire from the battery to the block and will tie all of the lights through it.
The winch was heavy and in the way, so we mounted that real quick. I have tow hooks that I was hoping to install on the front but the winch plate from Harbor Freight didn't have the clearance. I'll figure out what to do in the spring about that.

The first lights we installed were the front Delta 100 fogs. These are aftermarket because the OEM are almost impossible to find (p.s. if you have a set, I am interested in buying them). These are xenon based and look very close to the OEM fogs that were an option on the Sahara models. We ran the wires easy enough to the lights, found a ground point, installed a switch and done.

We left the rear fogs last because we had to run 20+ feet of wiring and as it was late in the day, we got lazy. Trying not to interfere with the rear tailgate, I did my best guess on where the rear fogs should go and drilled into the tail light housing (we found the bolts, btw, in the bucket of random bolts. We, uh, did not mark these)

We drilled a small hold next to the bottom lightbulb to run a wire through the existing opening on the body. We drilled another small hole next to the mounting bracket for the fog light to run the positive wire. Nice these about these lights is that the mounting bracket acts as the ground point. So we drilled through the top of the light housing and through the huge existing ground plate and were done.
The final product of the rear light was one of the items I was excited to see. I never understood why the Jurassic Park Jeep designers put the rear fog lights on the Jeep, but I was always enamored by them. Seeing these installed made me a happy man!


We cleaned up the interior yesterday in preparation for the soft top and interior install. The soft top install went, ok, but the cold temperatures and kinda subpar parts made for a tough install. We had a 65000 BTU forced air heater going and it definitely helped, but the Rampage top just has a few QC issues. I contacted them and they should be sending new parts soon, but unsurprisingly, it'll be a few d(el)ays.
So not many things left to do. We need to finish the soft top install, wire the overhead lights, wire the winch to the battery, install the interior and do a road test.
"Dr. Alan Grant: You married?
Dr. Ian Malcolm: Occasionally."