Land Cruiser #26 (COMPLETED) - Building and maintenance

Showcase your Jurassic Park vehicle, or build progress.
User avatar
Henrique_Z_Tomassi
Posts: 129
Joined: April 11th, 2011, 11:11 am
Location: Brasília, Brazil
Contact:

Re: Henrique's Jurassic Land Cruiser #26

Post by Henrique_Z_Tomassi » October 8th, 2012, 7:12 am

It has been a while since I posted here the last time.
Things are much better now. Here are the progress.

The rear bumper is done, with LED lights.
Image

The front bumper is also finished.
Image

The spare tire holder is in place. The fuel gallon was converted to a storage case.
Image
Image
Image
Image

Then the hard top came. It didn`t fit well, but was enough for the roll bars to be measured.
Image
Image
Image

The roll bars were projected by me to be fixed directly in the frame. It increases security. I drawed the tubes and supervised its construction.
Image
Image
Image
Image
Image
Image
Image
Last edited by Henrique_Z_Tomassi on October 8th, 2012, 5:42 pm, edited 1 time in total.
"I feel sorry for that guy Enrique" Ian Malcolm

User avatar
Henrique_Z_Tomassi
Posts: 129
Joined: April 11th, 2011, 11:11 am
Location: Brasília, Brazil
Contact:

Re: Henrique's Jurassic Land Cruiser #26

Post by Henrique_Z_Tomassi » October 8th, 2012, 7:27 am

Then I took the car to the paint shop.
Image

Here are the decals. I made a new JP logo version with Corel Draw. Usually I need 1-2 hours to make a logo like that, but in that case I took an entire day. Based on the original 1993 movie poster, I made the most detailed and precise JP logo I ever saw.
Image
Image

The back and front seats, with new covers.
Image

Preparing the surface for the paint.
Image
Image
Image

The KPO (in white) prevents rust.
Image
Image

Parts with primer, ready to be painted.
Image
Image
Image

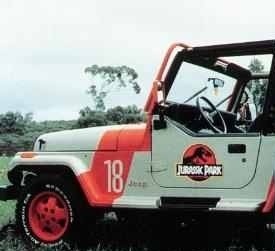
Now the parts painted. I took printed movie screencaps to the paint shop for me to choose the best colors to the car. For the body I choosed Branco Alasca ("Alaska white") is something between light grey and beige.
Image
Image
Image
Image

Then I planned where the red stripes should be painted. The angle is parallel to the windshield.
Image
Image

For the numbers, I made decals which, painted in red, should make the proper effect when removed.
Image
Image
Image
Image

I had to travel for a field trip one day before the painter paint the red stripes. The color I choosed for the stripes is Vermelho Ibérico ("Iberic Red"), which is a red with a hint of orange, as I could see in the movie screencaps. I Explained him how the stripes should be and crossed my fingers, hoping he would paint it right.
Last edited by Henrique_Z_Tomassi on February 2nd, 2015, 2:55 pm, edited 2 times in total.
"I feel sorry for that guy Enrique" Ian Malcolm

User avatar
ratrace427
Completed JP Jeep
Posts: 950
Joined: February 29th, 2012, 4:47 pm
Location: Tulsa, Ok
Contact:

Re: Henrique's Jurassic Land Cruiser #26

Post by ratrace427 » October 8th, 2012, 10:12 am

WOW!
I am John Sisemore on Facebook

User avatar
Henrique_Z_Tomassi
Posts: 129
Joined: April 11th, 2011, 11:11 am
Location: Brasília, Brazil
Contact:

Re: Henrique's Jurassic Land Cruiser #26

Post by Henrique_Z_Tomassi » October 8th, 2012, 6:26 pm

The guy finished painting and I'm still away from home. My brother took the vehicle to his place and send me some pictures by e-mail.
I can't wait to get back to see it in front of me!
Here are the pictures, "Hold on to your butts!"

Image
Image
Image
Image

I can't be sure only by looking at the pictures, but maybe the body should be darker. If so, "Next time, everything's correctable. Creation is an act of sheer will. Next time it'll be flawless". The red color is for sure perfect.
Under the #26 there is the snorkel hole.
Image
Image
Image
Image


As I wrote in the previous post, I drew some of the stripe's lines, but the painter should finish mounting the front section of the Land Cruiser for the stripe thickness to be established. I carefully explained him how it should be done and he still didn't made it correct.
Take a look at the pictures below. The blue arrows are the lines I drew before going to the field trip. The green arrows are the lines he made. At the end, the lines aren't parallel. I called him and we agreeded to corect the stripes when I get back.
Image
Image

Another problem is with the hard top. It didn't fit well over the windscreen. It is shifted to the driver's side. I'll have to find a way to make it work.
Image
Image
"I feel sorry for that guy Enrique" Ian Malcolm

User avatar
yj87jp
Posts: 249
Joined: April 22nd, 2012, 2:55 pm
Contact:

Re: Henrique's Jurassic Land Cruiser #26

Post by yj87jp » October 8th, 2012, 6:48 pm

THIS IS AMAZING :D
WE GOT DODSON, WE GOT DODSON HERE!

User avatar
Henrique_Z_Tomassi
Posts: 129
Joined: April 11th, 2011, 11:11 am
Location: Brasília, Brazil
Contact:

Re: Henrique's Jurassic Land Cruiser #26

Post by Henrique_Z_Tomassi » October 11th, 2012, 10:32 am

This is a simulation of the way I wanted to be painted.

Image

Does the front and rear strips has the same width? That's the way I'm going to do.
"I feel sorry for that guy Enrique" Ian Malcolm

User avatar
ratrace427
Completed JP Jeep
Posts: 950
Joined: February 29th, 2012, 4:47 pm
Location: Tulsa, Ok
Contact:

Re: Henrique's Jurassic Land Cruiser #26

Post by ratrace427 » October 3rd, 2013, 9:48 am

Is it finished? I would like to see it.
I am John Sisemore on Facebook

User avatar
Henrique_Z_Tomassi
Posts: 129
Joined: April 11th, 2011, 11:11 am
Location: Brasília, Brazil
Contact:

Re: Henrique's Jurassic Land Cruiser #26

Post by Henrique_Z_Tomassi » October 3rd, 2013, 12:18 pm

Almost. I didn't posted the updates in the past months, but there are some. I'll post some pictures as soon as I have time.
"I feel sorry for that guy Enrique" Ian Malcolm

User avatar
Henrique_Z_Tomassi
Posts: 129
Joined: April 11th, 2011, 11:11 am
Location: Brasília, Brazil
Contact:

Re: Henrique's Jurassic Land Cruiser #26

Post by Henrique_Z_Tomassi » November 12th, 2013, 4:49 pm

Well, here are the updates.

The instalation of hydraulic power steering (green).
direcao.jpg
direcao.jpg (121.54 KiB) Viewed 65158 times
The new instrument panel.
painel.jpg
painel.jpg (102.53 KiB) Viewed 65158 times
Conecting electric stuff.
instrumentos.jpg
instrumentos.jpg (135.5 KiB) Viewed 65158 times
luzes.jpg
luzes.jpg (94.55 KiB) Viewed 65158 times
luzes.jpg
luzes.jpg (107.11 KiB) Viewed 65158 times
The seat base.
suporte.jpg
suporte.jpg (101.86 KiB) Viewed 65158 times
baseassento.jpg
baseassento.jpg (87.11 KiB) Viewed 65158 times
banco1.jpg
banco1.jpg (103.47 KiB) Viewed 65158 times
banco2.jpg
banco2.jpg (93.43 KiB) Viewed 65158 times
"I feel sorry for that guy Enrique" Ian Malcolm

User avatar
Henrique_Z_Tomassi
Posts: 129
Joined: April 11th, 2011, 11:11 am
Location: Brasília, Brazil
Contact:

Re: Henrique's Jurassic Land Cruiser #26

Post by Henrique_Z_Tomassi » November 12th, 2013, 5:15 pm

All seats in place. The rear seat was made to be easily removable.
There is also the new wheels. I still have to paint it in red.
Bancos1.jpg
Bancos1.jpg (208.12 KiB) Viewed 65157 times
The odometer and speedometer in place.
hodometro.jpg
hodometro.jpg (98.65 KiB) Viewed 65157 times
On June the vehicle was already able to run in the street, despite some things to do.
garagem.jpg
garagem.jpg (80.25 KiB) Viewed 65157 times
On July I removed the front bull bar because I thought it would look better without it.
quebra.jpg
quebra.jpg (120.76 KiB) Viewed 65157 times
It is today on a car shop because there were some strange noises coming from the gear. We found some problems there. Next step is to finish painting, install the hard top, the full doors and add the door decals.
"I feel sorry for that guy Enrique" Ian Malcolm

Post Reply

Who is online

Users browsing this forum: No registered users and 19 guests