Nothing really ground breaking here. In fact, I'm admittedly stealing a bunch of ideas from Jack_Fauth's build
viewtopic.php?f=20&t=1782
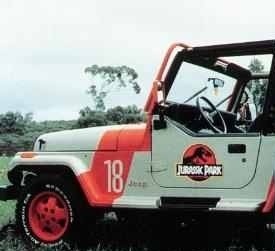
Picked these two jeeps up a few months ago.

- pw01.jpg (59.66 KiB) Viewed 17960 times
I chop shopped the smaller one pretty quickly and it's been sitting in my basement collecting dust in pieces for about 2 months. This week I finally got around to working on it, although it's kind of tough working when the kiddo isn't around because of fumes and it is way too cold outside to work in the garage.

- pw02.jpg (52.23 KiB) Viewed 17960 times
Started cutting and fitting for the "YJ grill conversion"

- pw06.jpg (75.09 KiB) Viewed 17960 times
Got them glued in and filled the gaps with plumber's epoxy. I couldn't think of any other products that would fill such a large gap, so I hope I made the right choice. Lighting kind of sucks but the housings sit flush with the grill. It cured enough for me to sand down and started with a layer of bondo.
In the mean time, I now had leftover lenses and light grills, so decided to make functioning fog lights.

- pw03.jpg (46.37 KiB) Viewed 17960 times
3" PVC fit almost perfectly. Getting the lenses/grills to stay in was trial and error.

- pw04.jpg (49.11 KiB) Viewed 17960 times
Lights are in, and can be removed easily for access to the lighting. I will also be deleting the front center license plate. I need to come up with a good way to come up with inexpensive front and rear "mini" JP plates.

- pw05.jpg (33.61 KiB) Viewed 17960 times
Aaaand reupholstered the seat. Not sure if I'll spray on the pouches or add real ones, or just leave it like this.
So the other plans are to add functioning head lights, tail lights, and fog lights. Also, I'm going to "delete" the gas tank cap. No idea why they designed it to go there on these Power Wheels (rear passenger side). Probably going with JP13 for this one, JP14 for the bigger PW, and JP15 for my *real* Jeep. I don't think I'm going to add a winch (can't find one!). I'm also going to look in to deleting the spot lights on the roll bar. I might have to replace that whole thing with a length of PVC. I've read making them functioning lights just shines light on the back of the driver's head, so I'm not too concerned with losing them.