Thanks yeah one of the guys that bought my old seats told me about it. Im not painting the interior and the carpet I have is dark grey so I'll be swapping that out soon anyways. Ill probably spray it with raptor liner when I do that early this summer.KytorIndustries wrote:Looking good. I'm glad my diagram helped you out.
While you have the interior stripped I would strongly recommend you RaptorLiner the interior bed. Local automotive paint shops will carry it and can tint it too if you prefer. You'll be out the door around $130-150 and it will protect your tub orders of magnitude better than stock or aftermarket paint. If you have any surface rust areas, hit them with POR 15 before you line.
Seattle Jeep 12 Rebuild
-
Xsev3russnap3x
- Posts: 29
- Joined: July 24th, 2015, 12:29 am
- Location: Seattle WA
- Contact:
Re: Seattle Jeep 12 Rebuild

-
ratrace427
- Completed JP Jeep
- Posts: 950
- Joined: February 29th, 2012, 4:47 pm
- Location: Tulsa, Ok
- Contact:
Re: Seattle Jeep 12 Rebuild
I have had great success with "SEM flex coat" paint on my car restorations. You can paint carpet with it as well. I lay the carpet out and after it is dry from being washed i use a scrub brush for washing dishes to rub the paint into the fibers as i paint. After market carpets dont have the fit and quality that the original has.
I am John Sisemore on Facebook
-
Xsev3russnap3x
- Posts: 29
- Joined: July 24th, 2015, 12:29 am
- Location: Seattle WA
- Contact:
Re: Seattle Jeep 12 Rebuild
I've been trying to hold back posting an update till the paint job is finished but i realized that would be a HUGE post. So ill show some preview on the paints but I've got alot of background details to share. Then next post in the next couple days will be the finished product.
So my two biggest suggestion for JP Jeep builds is take your time and have someone be your filter. It is a dream car that when in the build progress its really easy to take the faster or simple way. Your gonna still get the Jeep done but you will "wish you had just done that one thing when you had the chance" or whatever for years to come. Especially with something as permanent as a paint job there were several times where I wanted to take the easy route and have it done but leaving me with some bad finishes that when up close would kill me.
My filter being my cousin helping me a huge amount through the build convinced me I'll be much happier doing it the right way. Painting the whole Jeep sand beige then painting the red stripes after rather then using my stock red paint. given that my whole schedule on things got pushed back. But I'm very happy its being done right.
I'll start with parts as usual.
Just after the last post I got the custom door pouches in and I'm very happy with how they look. I could go for repainting the panels themselves a bit down the road as the green is pretty light in person.
I also got the sticker kit for 12 in the mail from Jack_Fauth he got them out fairly quickly as I was expecting the paint to be happening sooner so I'm glad he was willing to get it out to me quickly.
I ghetto stitched the drivers seat and replaced the foam inside with memory foam so I now have an extra passanger seat of all things.
Given that I spend alot of time on PC and the seats are really comfy I bolted it to the office chair rollers and its now my desk chair. Super super comfy now.
Now a bit into paint I'll show the full run down on the process I've been taking next post, but here it is currently.
All thats left is red and I was up till 3 last night (3 was getting to bed early compared to some of the other nights) masking the fenders and setting up the parts in the paint booth. My hope is to paint tonight give it a day to dry in 80 degree space then i'll put everything back together if its dry enough and tow it back to my place (don't have a windshield glass in yet) and leave it in my clean garage to let the paint finalize drying. I'll bring her out to get some pics for the next post so maybe a few days before I make an update.
and lastly I bought the stock color Sand Beige LJ1 and Ford Performance Red for the paint. The sand beige I can say looks really nice while the red I have yet to see painted on something so I'm hoping there's nothing off about it. But in the can it looks perfect so chances are its right on.
-Aiden H
So my two biggest suggestion for JP Jeep builds is take your time and have someone be your filter. It is a dream car that when in the build progress its really easy to take the faster or simple way. Your gonna still get the Jeep done but you will "wish you had just done that one thing when you had the chance" or whatever for years to come. Especially with something as permanent as a paint job there were several times where I wanted to take the easy route and have it done but leaving me with some bad finishes that when up close would kill me.
My filter being my cousin helping me a huge amount through the build convinced me I'll be much happier doing it the right way. Painting the whole Jeep sand beige then painting the red stripes after rather then using my stock red paint. given that my whole schedule on things got pushed back. But I'm very happy its being done right.
I'll start with parts as usual.
- stickers.jpg (24.61 KiB) Viewed 6855 times
- seats.jpg (85.5 KiB) Viewed 6855 times
- chair.jpg (184.33 KiB) Viewed 6855 times
Now a bit into paint I'll show the full run down on the process I've been taking next post, but here it is currently.
- Jeepppp.jpg (117.87 KiB) Viewed 6855 times
- paints.jpg (106.7 KiB) Viewed 6855 times
-Aiden H
-
Xsev3russnap3x
- Posts: 29
- Joined: July 24th, 2015, 12:29 am
- Location: Seattle WA
- Contact:
Re: Seattle Jeep 12 Rebuild
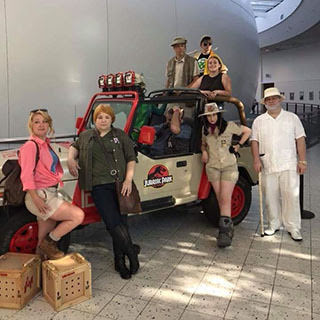
And with that. Shes all done. Mostly...
Theres a list of parts I can still add to the jeep over time like the rear KC fog lights and the jabscos have a space on top of the bar, alongside the winch and the whip antenna. Most importantly I want to get the correct roll bar, Sun visors, and I'm still missing windshield glass which should happen in a day or two here.
But most importantly into the process.
The person I bought my jeep from brought her out alot as a beach car so there was naturally ALOT of paint chips on the front and the windshield. This took a majority of my time to fill and get it smooth.
For the fendors I used Bulldog adhession spray and its come out nice and strong.
When it came time to spray the primer I went with what the shop considered the "cheaper" of the two primer options but its still a very quality product.
Primer went on nicely I ended up sanding down alot of it to make sure things were smooth.
Sand Beige Metallic LJ1 went on very clean and I gave it awhile to dry then masked to the Kytor Industrys dimensions I mentioned earlier.
Now puting primer over sand beige wasn't necessary but this was one of those things I figured the prop department probably got Fords stock primer alongside Performance Red as they would have gotten an already finished dry stock Jeep they would need to put primer on top. Alongside the paint shop told me stock car colors need a specific color of primer underneath to achieve the original shade of red Without coating 5 or 6 times. Its a small detail I was willing to spend the extra bit on to make sure the red is the right shade.
Ford Performance Red went on a bit blotchy the first time so I ended up waiting a day and doing another coating. Turned out amazing.
The day I could unmask was a wonderful day. All the lines turned out perfect.
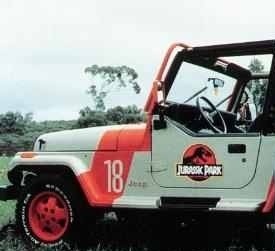
I cant stress enough for those looking to build a Jurassic Park Jeep to get the right color. Even though the movie shots look more grey or the red could be any red. Take it from someone who tried building his Jeep with dark grey matte vinyl to start. Its nothing to the metallic shine the sand beige gives off and the red is a beautiful eye catching almost orange looking color that works amazingly with the sand beige.
I'm considering the jeep "done" for now although I would like to buy legit Jabscos as I did get the light bar custom built with the plate for that reason. Alongside all the other Parts Ill be adding but the main part of my build is there and done and I'm very relieved to have it turn out the way I wanted. I cant thank everyone on the forum enough I definitely couldn't have done this without the years of research this community has built up. THANK YOU SO MUCH!
-Aiden H
But most importantly into the process.
- JeepFiller1.jpg (177.67 KiB) Viewed 6839 times
- JeepFiller2.jpg (132.25 KiB) Viewed 6839 times
- Adhession.jpg (76.71 KiB) Viewed 6839 times
- Primer.jpg (129.18 KiB) Viewed 6839 times
- JeepPrimer3.jpg (115.53 KiB) Viewed 6839 times
- JeepPrimer1.jpg (113.61 KiB) Viewed 6839 times
- Sandbeige1.jpg (131.33 KiB) Viewed 6839 times
- SandBeige2.jpg (97.36 KiB) Viewed 6839 times
- RedPrimer1.jpg (92.73 KiB) Viewed 6839 times
- JeepRed1.jpg (137.58 KiB) Viewed 6839 times
- JeepRed2.jpg (155.8 KiB) Viewed 6839 times
- Jeepunmask1.jpg (125.99 KiB) Viewed 6839 times
- JeepDone2.jpg (160 KiB) Viewed 6839 times
- JeepDone3.jpg (155.71 KiB) Viewed 6839 times
- JeepDone4.jpg (159.71 KiB) Viewed 6839 times
- barbjpg.jpg (144.94 KiB) Viewed 6839 times
-Aiden H
-
KytorIndustries

- Posts: 99
- Joined: November 13th, 2016, 6:58 pm
- Contact:
Re: Seattle Jeep 12 Rebuild
You have made massive progress since the last post. Nice work, your attention to detail paid off.
Kytor Industries
kytor.com
kytor.com
Who is online
Users browsing this forum: No registered users and 30 guests