It was "In the making" but now "It's made"
-
ratrace427
- Completed JP Jeep
- Posts: 950
- Joined: February 29th, 2012, 4:47 pm
- Location: Tulsa, Ok
- Contact:
It was "In the making" but now "It's made"
Another Okie JP18
After close examination of the HD screen shots my paint guy noticed that the 8 does not center in the body line
The 1 goes right in front of the body line on the pass. side
I didnt like the size of the hood decal from 8bit so i custom ordered a larger one from them.
I chose to paint the wheels before mounting the tires. Two of the wheels flaked some at a little spot on the edge but nothing a small touch up wouldn't cure
I am John Sisemore on Facebook
-
ratrace427
- Completed JP Jeep
- Posts: 950
- Joined: February 29th, 2012, 4:47 pm
- Location: Tulsa, Ok
- Contact:
Re: It was "In the making" but now "It's made"
My paint guy wrote a summary with pictures. I left the pictures out
On Sep 18, 2012, at 5:42 AM, Marty O'Rourke wrote:
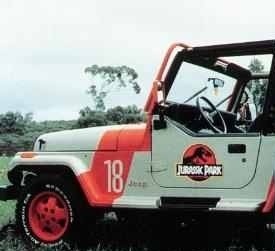
The project was to reproduce the Jurassic Park JP18 stripe's onto a Jeep.
1) This is the one of two still's I used to guide me.
2) Still #2. There are no definite dimension's available so you have to use reference point's and a lot of eyeing. I did visit the Jurassic Park Jeep Forum for plenty of useful information.
3) The Jeep was the correct model and color. Sand Beige poly, low gloss.
4) Decal's installed. Some part's were removed for ease of masking and painting.
5) Starting with the wheel's. They were blasted to clean the surface.
5) Applied one good coat of epoxy primer.
6) Three coat's of Radiant Fire red base.
7) Next was to apply the clear coat. The red finish on the jeep was a low gloss so I added a flattener to the clear coat. I applied two good coat's of low gloss clear.
8) Now the real challenge, striping out the Jeep. Using the still photo's, I found some reference point's. I didn't have a picture of the Hood but I found a starting point of 5.5 inch's on the forum for the hood stripe. This was a reference point from the hood's edge to just past the hood hinge's. Now I could bring the striping tape down to the flare to the second reference point. I found this by using the front of the fender and running a straight edge to the rear of the flare. To keep the curve consistent, I used 8.5 inch's at the lower hood to fender gap. The rear of the stripe by the door was found by finding the center of the second "e" in Jeep and running a a straight edge up to the body line. This gave me a starting point for the tape line that ran down to the flare seam. Fine line tape was used to tape off the stripe. The 18 is in the wrong position at this time.
9) Using an angle finder I found the stripe was about 20 degrees. That is a good starting point for the rear stripe. Starting at the bottom of the rear flare I ran the tape up to the top of the quarter, keeping the tape at 20*. An other measurement from the forum said the rear stripe was 12.5" wide. I decided it didn't look proper and eyed it to 14". Then from 14" down to the flare to just past center. Now to reproduce the taping to the right side. Once the taping was completed,I marked the tape with yellow masking tape so it could be seen better. I moved the jeep outside to make sure the angle's were even.
10) I was off 1/4' on the right rear aft tape at the top. Easy fix and back into the shop for masking.
11) Plenty of through mask to be done. I used speed tape to hold the fineline tape down in all the compound curve's. I don't want the paint blowing under loose tape.
12) Just before painting, I apply the decal's used for masking. For location of the 18., I found the bottom of the "1" stem is lined up to the bottom of the antenna base and the body seam just to the back of the stem. The "1" is just under 3" from the hood gap. The decal is applied with soap and water.
13) The left "18" was placed just under 3" from the hood gap.
14) This put the "18" where it suppose to be by looking at the still's. About a 1/4 inch of the open area is lined up with the top of the "J" and the body line is in the right place. The panel was spritzed with soap and water and the decal was applied.
15) Once the decal's were dry, I cut the decal at the seam's and used speed tape to prevent paint blow through.
16) The base and low gloss clear is applied. After the last coat the fineline tape was pulled to soften the paint edge.
17) Once the paint dried, I pulled off the masking. No leak's or blow through's!
18) Top/front.
19) Rear.
20) The paint has not cured yet, the shine will dull in a few hour's.
21) Installed the wheel's and light bar and moved it outside.
22) Rear.
23) Side.
24) Front.
25) Back.
26) Last one.
That completes' the Jurassic Park Jeep.
Marty.
On Sep 18, 2012, at 5:42 AM, Marty O'Rourke wrote:
The project was to reproduce the Jurassic Park JP18 stripe's onto a Jeep.
1) This is the one of two still's I used to guide me.
2) Still #2. There are no definite dimension's available so you have to use reference point's and a lot of eyeing. I did visit the Jurassic Park Jeep Forum for plenty of useful information.
3) The Jeep was the correct model and color. Sand Beige poly, low gloss.
4) Decal's installed. Some part's were removed for ease of masking and painting.
- DSC02241.JPG (172.39 KiB) Viewed 169948 times
5) Starting with the wheel's. They were blasted to clean the surface.
- DSC02248.JPG (184.66 KiB) Viewed 169948 times
5) Applied one good coat of epoxy primer.
6) Three coat's of Radiant Fire red base.
7) Next was to apply the clear coat. The red finish on the jeep was a low gloss so I added a flattener to the clear coat. I applied two good coat's of low gloss clear.
- DSC02251.JPG (187.82 KiB) Viewed 169948 times
8) Now the real challenge, striping out the Jeep. Using the still photo's, I found some reference point's. I didn't have a picture of the Hood but I found a starting point of 5.5 inch's on the forum for the hood stripe. This was a reference point from the hood's edge to just past the hood hinge's. Now I could bring the striping tape down to the flare to the second reference point. I found this by using the front of the fender and running a straight edge to the rear of the flare. To keep the curve consistent, I used 8.5 inch's at the lower hood to fender gap. The rear of the stripe by the door was found by finding the center of the second "e" in Jeep and running a a straight edge up to the body line. This gave me a starting point for the tape line that ran down to the flare seam. Fine line tape was used to tape off the stripe. The 18 is in the wrong position at this time.
- DSC02254.JPG (175.76 KiB) Viewed 169948 times
9) Using an angle finder I found the stripe was about 20 degrees. That is a good starting point for the rear stripe. Starting at the bottom of the rear flare I ran the tape up to the top of the quarter, keeping the tape at 20*. An other measurement from the forum said the rear stripe was 12.5" wide. I decided it didn't look proper and eyed it to 14". Then from 14" down to the flare to just past center. Now to reproduce the taping to the right side. Once the taping was completed,I marked the tape with yellow masking tape so it could be seen better. I moved the jeep outside to make sure the angle's were even.
- DSC02257.JPG (306.75 KiB) Viewed 169948 times
10) I was off 1/4' on the right rear aft tape at the top. Easy fix and back into the shop for masking.
11) Plenty of through mask to be done. I used speed tape to hold the fineline tape down in all the compound curve's. I don't want the paint blowing under loose tape.
12) Just before painting, I apply the decal's used for masking. For location of the 18., I found the bottom of the "1" stem is lined up to the bottom of the antenna base and the body seam just to the back of the stem. The "1" is just under 3" from the hood gap. The decal is applied with soap and water.
- DSC02264.JPG (115.88 KiB) Viewed 169948 times
13) The left "18" was placed just under 3" from the hood gap.
- DSC02265.JPG (124.4 KiB) Viewed 169948 times
14) This put the "18" where it suppose to be by looking at the still's. About a 1/4 inch of the open area is lined up with the top of the "J" and the body line is in the right place. The panel was spritzed with soap and water and the decal was applied.
- DSC02266.JPG (155.2 KiB) Viewed 169948 times
15) Once the decal's were dry, I cut the decal at the seam's and used speed tape to prevent paint blow through.
16) The base and low gloss clear is applied. After the last coat the fineline tape was pulled to soften the paint edge.
- DSC02268.JPG (200.59 KiB) Viewed 169948 times
17) Once the paint dried, I pulled off the masking. No leak's or blow through's!
18) Top/front.
19) Rear.
20) The paint has not cured yet, the shine will dull in a few hour's.
21) Installed the wheel's and light bar and moved it outside.
22) Rear.
23) Side.
- DSC02279.JPG (370.7 KiB) Viewed 169943 times
24) Front.
- DSC02282.JPG (303.95 KiB) Viewed 169943 times
26) Last one.
That completes' the Jurassic Park Jeep.
Marty.
Last edited by ratrace427 on September 18th, 2012, 7:23 pm, edited 4 times in total.
I am John Sisemore on Facebook
-
DrewSmith007

- Site Moderator
- Posts: 725
- Joined: February 3rd, 2011, 10:44 pm
- Vehicle Make/Model: 1993 Ford Explorer
- Location: Wichita, KS
- Contact:
Re: It was "In the making" but now "It's made"
Looks great man, congrats!
-
piotrzloto12
- Posts: 14
- Joined: September 11th, 2012, 5:22 pm
- Contact:
Re: It was "In the making" but now "It's made"
Is it possible to add in the pics that were taken during the process? It would make it much easier to understand what is going on here with visual references. Amazing job on the Jeep btw 

Re: It was "In the making" but now "It's made"
Sweet! and Congratz! Can't wait to see it in person.
1993 Jeep Wrangler Sahara
JP #21
Oklahoma State Dinosaur: Saurophaganax which can be seen in Oklahoma at The Sam Noble Museum
JP #21
Oklahoma State Dinosaur: Saurophaganax which can be seen in Oklahoma at The Sam Noble Museum

Re: It was "In the making" but now "It's made"
You have a pretty thorough paint guy!
So you started with correct base color.... what did he charge you for the stripe work?
Ohh and Looks great!
So you started with correct base color.... what did he charge you for the stripe work?
Ohh and Looks great!
1993 Sahara - JP29 - Denver, CO
-
ImperialTrooper
- Site Administrator
- Posts: 882
- Joined: July 12th, 2010, 6:32 am
- Location: Las Vegas, NV
- Contact:
Re: It was "In the making" but now "It's made"
Looks awesome, good choice on the painter!
-
ratrace427
- Completed JP Jeep
- Posts: 950
- Joined: February 29th, 2012, 4:47 pm
- Location: Tulsa, Ok
- Contact:
Re: It was "In the making" but now "It's made"
He charged $500 but he told me he should have charged $600 for the amount of work and time involved.COBrian wrote:You have a pretty thorough paint guy!
So you started with correct base color.... what did he charge you for the stripe work?
Ohh and Looks great!
I am John Sisemore on Facebook
-
ratrace427
- Completed JP Jeep
- Posts: 950
- Joined: February 29th, 2012, 4:47 pm
- Location: Tulsa, Ok
- Contact:
Re: It was "In the making" but now "It's made"
He had a issue with sending the pics attached within the email. Even so i will have to attach each one as a single then put it within the post. I will do that when i get all the pics he took but knowing where he had them within his layout will be a guess.piotrzloto12 wrote:Is it possible to add in the pics that were taken during the process? It would make it much easier to understand what is going on here with visual references. Amazing job on the Jeep btw
I am John Sisemore on Facebook
-
piotrzloto12
- Posts: 14
- Joined: September 11th, 2012, 5:22 pm
- Contact:
Re: It was "In the making" but now "It's made"
This looks really good, great job for 500 bucks! What I might end up doing is do the main color myself and then take it into a shop for the stripe. Really nice jeep
Who is online
Users browsing this forum: No registered users and 25 guests